1- Smokey Blues · Zedjue · Archikilla
Showing posts with label WordPress. Show all posts
Showing posts with label WordPress. Show all posts
Saturday, August 23, 2025
Wednesday, August 20, 2025
WordPress layouts for Music Events
Creating a spectacular WordPress site for a music festival can be done with the right Theme or by leveraging powerful page builders like Elementor with a good base theme. Here's a breakdown of some great options to consider:
Option 1: Using a dedicated Music Festival Theme
There are a number of themes specifically designed for musicians and events, which often include features like event calendars, discography sections, and media players.
- My Music Band: A free theme designed to promote music, bands, and solo artists. It has a clean design and includes features useful for showcasing your music and event information.
- Audioman: This free theme has a bold, modern design and includes all the essential sections for a music-related site, such as a featured content slider, hero content, and a music playlist section.
- Rock Star: This theme focuses on using social media effectively and has a homepage designed to feature your logo, tagline, and important content. It's built for musicians and bands.
- Euphony: This theme is a good option for musicians and bands, offering a strong feature set to launch a great website.
Option 2: Using a Multipurpose Theme with a Page Builder (Elementor or Astra)
This is often the best route for a truly "spectacular" and customized look, as it gives you the most design freedom. You'll use a fast, lightweight, and free base theme and then build out the content with a page builder.
Theme: Astra
Astra is an excellent choice for this method. The free version is incredibly fast and lightweight. The key here is to use their "Starter Templates" plugin.
Astra Starter Templates:
Astra offers a library of over 300 pre-designed, ready-to-import website templates in the "Event" or "Music" categories. They have a "Music Event" template specifically designed for this purpose. You can import these templates with a single click and then customize them easily with a page builder like Elementor.Page Builder: Elementor
Elementor is one of the most popular page builders for WordPress. To get the specific functionality you need for a music festival, you can use the free version with free addons.
Musician's Pack for Elementor:
This is a fantastic free addon that adds a ton of music-specific widgets and templates to Elementor. It's designed for musicians, bands, DJs, and event organizers. It includes custom post types for albums, events, and videos, as well as widgets to display these dynamically. You can create:* Event listings with countdown timers.
* Music players with playlists.
* Discography layouts.
* Artist/band member grids.
Tuesday, February 25, 2025
Python Web Development Fundamentals
These are Python Web Development fundamentals for developers familiar with PHP and JavaScript.
Core Frameworks
- Flask: Lightweight, similar to Express.js. Great for APIs and small apps.
- Django: Full-featured like Laravel/WordPress. Includes ORM, admin panel, auth system.
- FastAPI: Modern, high-performance framework with automatic API documentation.
Key Concepts
- Python uses indentation (not braces) for code blocks
- No semicolons needed
- Function-based views vs class-based views (similar to PHP procedural vs OOP)
Simple Flask Example (Compare to PHP)
```python
from flask import Flask, request, render_template
app = Flask(__name__)
@app.route('/') # Like PHP routing or .htaccess rules
def home():
return render_template('home.html', title='Home') # Similar to PHP include/require
@app.route('/user/<username>') # Dynamic URL parameter (like PHP $_GET)
def profile(username):
return f"Profile for {username}" # f-strings are Python's template literals
@app.route('/form', methods=['POST'])
def handle_form():
data = request.form # Similar to PHP $_POST
return f"Received: {data['name']}"
```
Database Access (vs PHP/MySQL)
```python
# Using Django ORM (compare to raw PHP MySQL)
from django.db import models
class Post(models.Model): # Similar to creating a DB table in PHP
title = models.CharField(max_length=200)
content = models.TextField()
pub_date = models.DateTimeField('date published')
Query example
posts = Post.objects.filter(pub_date__year=2023).order_by('-pub_date')
# vs PHP: SELECT * FROM posts WHERE YEAR(pub_date) = 2023 ORDER BY pub_date DESC
```
Template System (vs PHP/HTML)
```html
<!-- Django template (compare to PHP in HTML) -->
<h1>{{ post.title }}</h1> <!-- Like <?php echo $post->title; ?> -->
{% for comment in comments %} <!-- Like <?php foreach($comments as $comment): ?> -->
<p>{{ comment.text }}</p>
{% endfor %} <!-- Like <?php endforeach; ?> -->
```
Python web development uses more abstraction than PHP but has similar concepts to what you already know.
In PHP, you often work directly with the web server's request/response cycle. PHP files typically mix HTML and PHP code, with PHP handling server-side logic directly embedded in presentation markup. This is a more direct approach - the connection between your code and the HTTP mechanics is quite visible.
Python web development, by contrast, introduces more layers of abstraction:
- Framework-driven approach: Most Python web development happens through frameworks like Django or Flask that abstract away many HTTP details. Rather than writing code that directly outputs HTML, you define route handlers, views, and templates as separate components.
- Separation of concerns: Python web frameworks strongly encourage separating business logic, data access, and presentation. While PHP has frameworks that do this too (Laravel, Symfony), Python frameworks make this separation more fundamental.
- ORM prevalence: Python web development heavily relies on Object-Relational Mappers. While PHP has options like Doctrine, Python developers almost always use ORMs (Django ORM, SQLAlchemy) rather than writing raw SQL.
- Configuration over convention: Python frameworks often use decorators, configuration files, and class inheritance to define application behavior, versus PHP's more direct procedural approach in many cases.
Despite these differences, the underlying concepts remain similar: routes map to functions/methods, templates render data, database operations persist information, etc.
If you understand PHP's web development model, you'll recognize these patterns in Python - they're just wrapped in different syntax and architectural approaches.
Wednesday, January 8, 2025
Choosing the right Web Hosting Company for High-Performance WordPress and WooCommerce websites

Below there’s a detailed run-down of some of the best hosting companies, focusing on factors such as speed, reliability, support, and features specifically tailored for WordPress and WooCommerce.
Disclaimer:
Throughout my career, I have had the opportunity to work with and become affiliated with all of these web hosting providers. My involvement with them has primarily been driven by clients who had already chosen specific hosting packages for their projects.
Bear in mind that when selecting the most suitable web host for your business, it is crucial to understand that there is no one-size-fits-all solution. Each business has unique needs and requirements, therefore the decision should be made with careful consideration of several factors, including anticipated traffic, technical support needs, and the specific features offered by the hosting providers.
Selecting the right web host is a pivotal decision that can significantly impact the performance, security, and scalability of your website. Therefore, I encourage you to thoroughly evaluate your options, considering both your current needs and future growth, to ensure you choose the web hosting provider that aligns with your business objectives. Drop me a line and I'll be happy to help you choose.
1. Kinsta
Kinsta is a premium managed WordPress hosting provider powered by Google Cloud Platform (GCP). Known for its exceptional performance and customer support, Kinsta is a top choice for businesses that require robust hosting solutions.Key Features
- High Performance: Kinsta utilizes GCP's C2 machines, which are known for their high performance. This ensures fast load times and optimal website performance.
- Staging Environments: Offers staging environments for testing changes before going live.
- Automatic Backups: Daily automatic backups with options for manual backups.
- 24/7 Support: Expert WordPress support available around the clock.
- Developer-Friendly: SSH access, WP-CLI, Git integration, and more.
Pros
- Excellent uptime and speed.
- Scalable infrastructure.
- Comprehensive security features.
- Developer-friendly tools and environment.
Cons
- Higher cost compared to other hosting providers.
- No email hosting included.
2. WP Engine
WP Engine is another leading managed WordPress hosting provider, known for its reliability and speed. It's particularly well-suited for businesses and developers looking for a hassle-free hosting experience.Key Features
- Managed Hosting: Automatic updates, daily backups, and robust security measures.
- Performance: Proprietary caching technology and CDN integration.
- Development Tools: Staging environments, SSH, and Git integration.
- Customer Support: 24/7 support with WordPress experts.
- ecommerce Optimization: Specific features for WooCommerce performance enhancement.
Pros
- Strong focus on WordPress and WooCommerce.
- Fast, reliable, and secure.
- Excellent support and resources.
- Scalable plans to accommodate growth.
Cons
- Higher price point.
- Additional cost for some advanced features.
3. SiteGround
SiteGround is known for its excellent customer support and reliable hosting services. It offers a range of plans that cater to both small businesses and large enterprises.Key Features
- Speed: SuperCacher technology and free CDN for improved load times.
- Security: Daily backups, free SSL, and proactive monitoring.
- Support: 24/7 customer support with WordPress expertise.
- Ease of Use: User-friendly interface and automated WordPress installation.
- eCommerce: WooCommerce-optimized hosting plans.
Pros
- Affordable pricing.
- Strong emphasis on security.
- Excellent customer support.
- High performance and reliability.
Cons
- Limited storage on lower-tier plans.
- Renewal rates can be high.
4. Bluehost
Bluehost is a well-established hosting provider recommended by WordPress.org. It offers a range of hosting plans, including specialized WordPress hosting.Key Features
- One-Click WordPress Install: Simplifies the setup process.
- Performance: Free CDN and SSD storage for faster load times.
- Support: 24/7 customer support with WordPress experts.
- Security: Free SSL certificate and regular backups.
- WooCommerce Integration: Specific plans designed for WooCommerce.
Pros
- Affordable and beginner-friendly.
- Easy WordPress integration.
- Free domain for the first year.
- Good uptime and performance.
Cons
- Upselling during the checkout process.
- Higher renewal rates.
- Customer support can be inconsistent.
5. Flywheel
Flywheel is a managed WordPress hosting provider known for its user-friendly interface and robust performance. It's a great option for freelancers, agencies, and developers.Key Features
- Speed: Built-in caching and CDN for fast load times.
- Security: Nightly backups, malware monitoring, and free SSL.
- User Interface: Intuitive dashboard designed for ease of use.
- Collaboration Tools: Features for team collaboration and client management.
- Performance: Optimized for WooCommerce with specific features to enhance store performance.
Pros
- User-friendly interface.
- Excellent support and resources.
- High performance and reliability.
- Great for agencies and freelancers.
Cons
- Higher price compared to some other providers.
- Limited customization options.
6. A2 Hosting
A2 Hosting is known for its speed-focused hosting solutions. It offers a variety of hosting plans, including managed WordPress hosting.Key Features
- Performance: Turbo servers for up to 20x faster load times.
- Security: Free SSL, automatic backups, and enhanced security measures.
- Support: 24/7 Guru Crew support.
- Developer Tools: SSH access, WP-CLI, and staging environments.
- WooCommerce: Specific plans optimized for WooCommerce.
Pros
- Affordable and competitive pricing.
- Excellent speed and performance.
- Developer-friendly features.
- Reliable customer support.
Cons
- Interface can be complex for beginners.
- Some features available only on higher-tier plans.
7. IONOS
IONOS is a german web hosting provider, known for offering a wide range of hosting services tailored to various types of users, from individuals to large enterprises.
Established in 1988 as 1&1 Internet, the company rebranded to IONOS in 2018, reflecting its growth and expanded service offerings.
Key Features
- Affordable and Scalable: Shared hosting plans are cost-effective, making them suitable for small websites, blogs, and startups.
- Ease of Use: Intuitive control panel, ensuring that even users with minimal technical expertise can manage their websites effectively.
- Support: Managed hosting plans coWith SSD storage and a high uptime guarantee, IONOS ensures fast load times and reliable service.
- Optimized for WordPress: Specific plans come pre-configured with WordPress, ensuring optimal performance and security.
Pros
- Competitive Pricing.
- Comprehensive Support.
- Advanced Infrastructure.
- Global Presence.
Cons
- Interface can be complex for beginners.
- Advanced security tools and premium support, may come with additional costs.
8. Cloudways
Cloudways is one of my choices when I have the freedom to set up everything from scratch (the other one is ServerPilot), something that unfortunately only happens in very rare occasions.
Cloudways can be considered as a server management platform. It provides managed cloud hosting, enabling you to deploy and manage web applications on cloud servers from providers like DigitalOcean, AWS, Google Cloud Platform, Vultr, and Linode. It combines the power of these cloud platforms with managed hosting features tailored for WordPress and WooCommerce.
Key Features
- Choice of Cloud Providers: Users can choose from five cloud infrastructure providers: DigitalOcean, Linode, Vultr, AWS, and Google Cloud Platform.
- Performance Optimization: Advanced caching mechanisms (Varnish, Memcached, Redis), CDN integration, and PHP 7 ready servers for high performance.
- Scalability: Easy vertical scaling to increase server resources as needed.
- Managed Security: Regular security patching, dedicated firewalls, free SSL, and automated backups.
- Staging Environment: One-click staging environment for testing and development.
- 24/7 Support: 24/7 support via live chat and a ticketing system with an option for premium support plans.
- Ease of Use: User-friendly console with features like 1-click app installation and managed server monitoring.
- WooCommerce Optimization: Specific server configurations and features optimized for WooCommerce to handle high traffic and transactions.
Pros
- Flexibility: The ability to choose from multiple cloud providers allows for tailored solutions based on specific performance and budget needs.
- Performance: High-speed performance with advanced caching and the latest server technologies.
- Scalability: Easy scaling options ensure your website can handle increased traffic and demand.
- Managed Services: Takes care of server management, security, and backups, allowing you to focus on your website.
- Cost Efficiency: Pay-as-you-go pricing model helps in managing costs effectively.
Cons
- Complexity for Beginners: The flexibility and range of options can be overwhelming for users who are not familiar with cloud hosting.
- Support Limitations: Standard support is good, but priority and advanced support options come at an additional cost.
- No Domain Registration: Unlike traditional hosting providers, Cloudways does not offer domain registration services.
- No Email Hosting: Email hosting is not included, and you will need to use third-party email services.
Sunday, May 5, 2024
WordPress recovery mode
You can manually generate a recovery link to gain access to your WordPress site by adding:
/wp-login.php?action=entered_recovery_mode
right after your domain name.
For example, if your domain name is www.example.com, the 'safe mode' recovery URL would be:
https://www.example.com/wp-login.php?action=entered_recovery_mode
Sunday, September 3, 2023
Using Postman to test WordPress APIs
Postman is a robust platform for API development that enables developers to test, collaborate, and document APIs. It offers a user-friendly interface to perform different types of HTTP requests to your API, analyze the responses, and even automate testing.
Prerequisites:
- A local or live WordPress instance
- Postman installed on your computer
- Access to your WordPress admin to generate API keys (if necessary)
Step-by-Step Guide:
WordPress Configuration:
- Authentication: Before making API calls, you may need to authenticate your request. WordPress's REST API supports various authentication methods, including Basic Auth and OAuth. You might use plugins to help set these up if your WordPress installation doesn't already support them.
- Permalinks: Make sure that pretty permalinks are enabled in your WordPress settings. This is crucial for the REST API endpoints to work.
Postman Configuration:
- New Request: Open Postman and create a new request. Set the HTTP method to GET (or POST, PUT, DELETE, depending on your use-case).
- Set URL: Enter the URL of your WordPress API endpoint. For instance, if you are querying posts, your URL might look something like http://yourwebsite.com/wp-json/wp/v2/posts.
- Authentication: Based on what you configured in WordPress, set up the authentication in Postman. If you're using Basic Auth, this can often be set in the "Authorization" tab.
- Headers: Usually, you'd set the Content-Type to application/json.
- Parameters or Body: If your API call requires parameters (like filtering posts by category), you add these in the “Params” section. If you are making a POST request, the required data goes in the “Body” section.
Send Request: After setting all the necessary fields, click the "Send" button to make the API request.
Analyze Response: Once the request is made, Postman will show you the response received from the API. You can view the status code, headers, and response body.
Example to Fetch Posts:
```
HTTP Method: GET
URL: http://yourwebsite.com/wp-json/wp/v2/posts
Headers: Content-Type: application/json
```
Click "Send" and you should see a JSON response listing the posts.
Benefits of Using Postman with WordPress:
- Debugging: Easily test endpoints and debug issues.
- Documentation: Postman offers features to document API calls, which is beneficial for larger projects and team collaborations.
- Automation: Postman enables automated testing which can be integrated into CI/CD pipelines.
Thursday, August 24, 2023
Installing a local WordPress development environment on Manjaro
Installing a local WordPress development environment on Manjaro (or any other Linux distribution) typically involves setting up a LAMP (Linux, Apache, MySQL, PHP) or LEMP (Linux, Nginx, MySQL, PHP) stack and then installing WordPress on top of it.
How to set up a LAMP stack and WordPress on Manjaro:
1. Update System:
First, make sure your system is updated:
sudo pacman -Syu
2. Install Apache:
sudo pacman -S apache
Start and enable Apache:
bash
sudo systemctl start httpd
sudo systemctl enable httpd
You can check if Apache is working by opening your browser and visiting http://localhost. You should see the Apache test page.
3. Install MariaDB (MySQL):
sudo pacman -S mariadb
After installation, you need to initialize the MariaDB data directory:
css
sudo mysql_install_db --user=mysql --basedir=/usr --datadir=/var/lib/mysql
Then, start and enable the MariaDB service:
bash
sudo systemctl start mariadb
sudo systemctl enable mariadb
Secure your installation:
sudo mysql_secure_installation
You'll be asked a series of questions. For a local development environment, you can often hit enter to choose the default options, but make sure to set a strong root password.
4. Install PHP:
sudo pacman -S php php-apache
Now, you need to modify the Apache configuration to use PHP. Edit /etc/httpd/conf/httpd.conf:
bash
sudo nano /etc/httpd/conf/httpd.conf
Find and uncomment the line that says:
bash
LoadModule mpm_prefork_module modules/mod_mpm_prefork.so
Then, further down, find and uncomment:
shell
#LoadModule php7_module modules/libphp7.so
and add the following below it:
bash
Include conf/extra/php7_module.conf
Restart Apache to apply the changes:
sudo systemctl restart httpd
5. Install WordPress:
First, navigate to a directory where you want to download WordPress. Typically, this might be inside /srv/http/.
Download the latest WordPress:
bash
cd /srv/http/
sudo wget https://wordpress.org/latest.tar.gz
sudo tar -xvf latest.tar.gz
You might want to rename the resulting WordPress directory for convenience.
6. Create a Database for WordPress:
Log in to MariaDB:
css
mysql -u root -p
Then:
sql
CREATE DATABASE wordpress;
GRANT ALL PRIVILEGES ON wordpress.* TO 'wordpressuser'@'localhost' IDENTIFIED BY 'your_password';
FLUSH PRIVILEGES;
EXIT;
7. Configure WordPress:
Navigate to the WordPress directory and rename wp-config-sample.php to wp-config.php. Then edit the file:
arduino
cd wordpress
sudo cp wp-config-sample.php wp-config.php
sudo nano wp-config.php
Find the following lines and fill in the details:
sql
define('DB_NAME', 'wordpress');
define('DB_USER', 'wordpressuser');
define('DB_PASSWORD', 'your_password');
define('DB_HOST', 'localhost');
Now, navigate to http://localhost/wordpress (or the directory name you chose) in your web browser and complete the WordPress installation.
That's it! Your LAMP stack is now set up on Manjaro with WordPress!. Adjust configurations as needed based on your specific development requirements.
How to set up a LAMP stack and WordPress on Manjaro:
Setting up a LEMP (Linux, Nginx, MySQL, PHP) stack on Manjaro and then installing WordPress on top of it involves the following steps:
1. Update System:
Make sure your system is updated:
sudo pacman -Syu
2. Install Nginx:
sudo pacman -S nginx
Start and enable Nginx:
bash
sudo systemctl start nginx
sudo systemctl enable nginx
To confirm Nginx is working, open a browser and go to http://localhost. You should see the Nginx welcome page.
3. Install MariaDB (MySQL):
sudo pacman -S mariadb
Initialize the MariaDB data directory:
css
sudo mysql_install_db --user=mysql --basedir=/usr --datadir=/var/lib/mysql
Start and enable the MariaDB service:
bash
sudo systemctl start mariadb
sudo systemctl enable mariadb
Secure the installation:
sudo mysql_secure_installation
Follow the on-screen prompts, setting a root password and making selections appropriate for your environment.
4. Install PHP and PHP-FPM:
sudo pacman -S php php-fpm
Start and enable PHP-FPM:
bash
sudo systemctl start php-fpm
sudo systemctl enable php-fpm
5. Configure Nginx for PHP:
Edit the default Nginx server block or create a new configuration file:
arduino
sudo nano /etc/nginx/conf.d/default.conf
Add or modify the location block for PHP:
nginx
location ~ \.php$ {
    root           /usr/share/nginx/html;
    fastcgi_pass   127.0.0.1:9000;
    fastcgi_index  index.php;
    fastcgi_param  SCRIPT_FILENAME  $document_root$fastcgi_script_name;
    include        fastcgi_params;
}
Restart Nginx to apply the changes:
sudo systemctl restart nginx
6. Install WordPress:
Navigate to Nginx's default web directory or your chosen directory:
bash
cd /usr/share/nginx/html
Download the latest WordPress:
arduino
sudo wget https://wordpress.org/latest.tar.gz
sudo tar -xvf latest.tar.gz
If you'd like, you can move the contents of the wordpress directory to the root of your web directory.
7. Create a Database for WordPress:
Log in to MariaDB:
css
mysql -u root -p
Create the WordPress database and user:
sql
CREATE DATABASE wordpress;
GRANT ALL PRIVILEGES ON wordpress.* TO 'wordpressuser'@'localhost' IDENTIFIED BY 'your_password';
FLUSH PRIVILEGES;
EXIT;
8. Configure WordPress:
Navigate to the WordPress directory (if you didn't move the files, this would be inside a wordpress subdirectory) and rename wp-config-sample.php to wp-config.php:
arduino
cd wordpress
sudo cp wp-config-sample.php wp-config.php
sudo nano wp-config.php
Update the database details:
sql
define('DB_NAME', 'wordpress');
define('DB_USER', 'wordpressuser');
define('DB_PASSWORD', 'your_password');
define('DB_HOST', 'localhost');
Finally, navigate to http://localhost/wordpress in your browser and complete the WordPress installation steps.
Your LEMP stack is now set up on Manjaro with WordPress! Adjust configurations as necessary based on your specific requirements.
Thursday, August 12, 2021
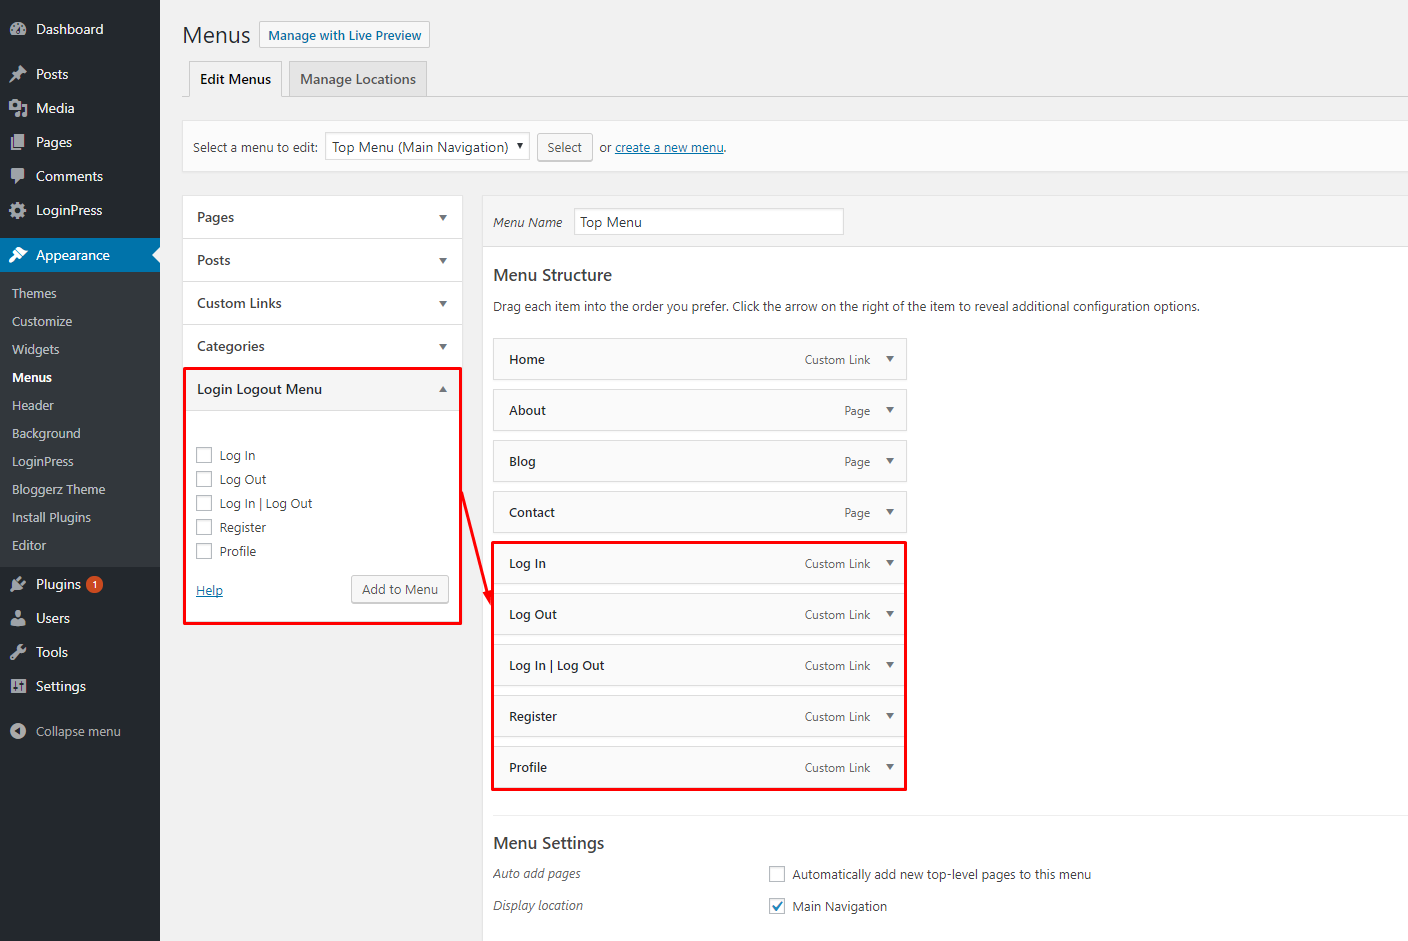
Adding LogIn / LogOut links to WordPress menus
The Problem:
Adding LogIn / LogOut links to WordPress menus depending on whether the user is logged in or out
The Solution:
1- Install the 'Login Logout Menu': https://wordpress.org/plugins/login-logout-menu/
2- Add to functions.php
/**
* Filter to redirect a user to a specific page after login.
*
* @return [URL] login url with page slug on which it will be redirected after login
*/
add_filter( 'login_logout_menu_login', 'loginpress_login_menu_login_redirect' );
function loginpress_login_menu_login_redirect()
{
return wp_login_url( '/members' );
}
/**
* Filter to redirect a user to a specific page after logout.
*
* @return [URL] logout url with page slug on which it will be redirected after logout
*/
add_filter( 'login_logout_menu_logout', 'loginpress_login_menu_logout_redirect' );
function loginpress_login_menu_logout_redirect()
{
return wp_logout_url( '/' );
}
Customizing the WordPress login Page
The Problem:

The Solution:
Add to functions.php
// Login Page
function rmm_custom_login_page() { ?>
<style type="text/css">
#login h1 a, .login h1 a {
background-image: url(https://example.com/wp-content/uploads/logo-image.jpg));
height:150px;
width:300px;
background-size: 300px 150px;
background-repeat: no-repeat;
padding-bottom: 10px;
}
body.login {
background-color: #89b2e0;
background-image: url(https://example.com/wp-content/uploads/background-image.jpg);
background-size: cover;
background-repeat: no-repeat;
background-attachment: fixed;
background-position: center;
}
.login #nav, #backtoblog {
background-color: white;
padding: 5px 25px!important;
}
</style>
<?php }
add_action( 'login_enqueue_scripts', 'rtm_login_logo' );
function rmt_login_logo_url() {
return home_url();
}
add_filter( 'login_headerurl', 'rmt_login_logo_url' );
function rmm_login_logo_url_title() {
return 'Logo Title';
}
add_filter( 'login_headertext', 'rmm_login_logo_url_title' );
<?php }
add_action( 'login_enqueue_scripts', 'custom_login_page' );
Sunday, June 14, 2015
Creating WooCommerce Template files in a Child Theme
You only need to copy over to your Child Theme the WooCommerce files that will be customized.
Those files are located at:
https://example.com/wp-content/plugins/woocommerce/templates/
First you need to create a woocommerce directory in your child Theme named "woocommerce". In this folder you will store the customized WooCommerce template files.
https://example.com/wp-content/themes/example-child/woocommerce/
So, for example, if you want to customize this file:
https://example.com/wp-content/plugins/woocommerce/templates/single-product/add-to-cart/external.php
You will need to create the directory and place that file in your child Theme folder so that you will have this:
https://example.com/wp-content/themes/example-child/woocommerce/single-product/add-to-cart/external.php
Now all the changes that you make to that file will override the original file at the plugin folder, and if you ever update WooCommerce the modifications will remain.
You will be able to know what files are overriding the original plugin files by going to:
https://example.com/wp-admin/admin.php?page=wc-status
Check Template Structure + overriding templates via a Theme for more info:
Tuesday, May 26, 2015
Automatically delete expired WooCommerce Transients in WordPress
Transients are used to store information into the WordPress database with an expiration time, the server load does not increase, and in most scenarios, it helps to speed the site.
However if your WordPress database options table (wp_options) accumulates old, expired transients that didn't get automatically cleared, they could end up bloating your database and even slowing down your website.
WooCommerce has a tool that allows you to the Products' Transient Cache and all the expired transients from WordPress. You can access it under WooCommerce > System Status > Tools

However if you need to delete the expired WooCommerce Transients (or any other Transients for that matter) in an automated manner, you have to implement some kind of Cron Job. Cron is a time-based job scheduler that allows you to run repetitive tasks unattended.
A "real" Cron Job always runs on the (Linux) server side, and generally speaking if you have access to the server tools needed to set it up, is always a much preferred solution. A WordPress Cron on the other hand is rather a pseudo-cron system, that is limited by several conditions. If you would like to dive into the technicalities here is an article that explains the differences in detail:
http://www.smashingmagazine.com/2013/10/16/schedule-events-using-wordpress-cron/
Since in most cases you will not have access to those server tools, you can place the following snippet into your functions.php file and then visit your site to force it to run:
global $wpdb; $sql = 'DELETE FROM ' . $wpdb->options . ' WHERE option_name LIKE "_transient_%"'; $wpdb->query($sql);
I was about to modify such script to purge expired transients on a daily basis for a WooCommerce installation, but it turns out someone has already come out with a solution, the 'Delete Expired Transients' plugin. I checked its code and it seems to be well-written and optimized for performance, using few resources. You can get it here:
https://wordpress.org/plugins/delete-expired-transients/
After you install and activate the plugin, the first thing it does is to schedule a housekeeping task to delete expired transients. This means that there may not be any transients found when you visit its settings page under the tools menu right after installing the plugin, because they may have already been deleted.

That means that you'll probably never need to delete expired transients manually, because they'll be automatically deleted on a daily basis, which should be more than enough to keep the database uncluttered under any situation.
However if your WordPress database options table (wp_options) accumulates old, expired transients that didn't get automatically cleared, they could end up bloating your database and even slowing down your website.
WooCommerce has a tool that allows you to the Products' Transient Cache and all the expired transients from WordPress. You can access it under WooCommerce > System Status > Tools
However if you need to delete the expired WooCommerce Transients (or any other Transients for that matter) in an automated manner, you have to implement some kind of Cron Job. Cron is a time-based job scheduler that allows you to run repetitive tasks unattended.
A "real" Cron Job always runs on the (Linux) server side, and generally speaking if you have access to the server tools needed to set it up, is always a much preferred solution. A WordPress Cron on the other hand is rather a pseudo-cron system, that is limited by several conditions. If you would like to dive into the technicalities here is an article that explains the differences in detail:
http://www.smashingmagazine.com/2013/10/16/schedule-events-using-wordpress-cron/
Since in most cases you will not have access to those server tools, you can place the following snippet into your functions.php file and then visit your site to force it to run:
global $wpdb; $sql = 'DELETE FROM ' . $wpdb->options . ' WHERE option_name LIKE "_transient_%"'; $wpdb->query($sql);
I was about to modify such script to purge expired transients on a daily basis for a WooCommerce installation, but it turns out someone has already come out with a solution, the 'Delete Expired Transients' plugin. I checked its code and it seems to be well-written and optimized for performance, using few resources. You can get it here:
https://wordpress.org/plugins/delete-expired-transients/
After you install and activate the plugin, the first thing it does is to schedule a housekeeping task to delete expired transients. This means that there may not be any transients found when you visit its settings page under the tools menu right after installing the plugin, because they may have already been deleted.
Tuesday, March 31, 2015
"http:" stripped out of the images link on RSS Feeds
Issue:
"http:" is being stripped out of the images link URL on RSS Feeds
This issue was taking place because 'HTTPS Protocol Rewriting' was turned on in the CloudFlare settings.
Protocol Rewriting in this context convert links within your WordPress site to images, stylesheets, and scripts from using either "http://" or "https://" to using just "//". This rewrite tells your browser to load all of these assets using the same protocol as the base page loaded.
By default, this option is enabled and for the majority of users there are no negative effects. However when outputting an RSS feed this rewriting breaks the absolute URL by stripping out the "http:" part and therefore prevents the images from being fetched.
Solution:
Disable HTTPS Protocol Rewriting in the settings for CloudFlare on the admin side of WordPress:

Wednesday, February 25, 2015
Character Encoding issue in WordPress after migration
If you start seeing weird characters instead of special characters such as the ampersand (&), or the copyright symbol ©, after migrating WordPress to a new server, try the following.
1) Download ‘wp-config.php’ from the root directory where you installed WordPress.
2) Open it, find the following 2 lines:
3) Re-upload the updated ‘wp-config.php’ file overwriting the old one.
If you cannot find the two lines above in your ‘wp-config.php’ file, try adding them instead. Some hosts strip them out.
1) Download ‘wp-config.php’ from the root directory where you installed WordPress.
2) Open it, find the following 2 lines:
define('DB_CHARSET', 'utf8');and comment them out:
define('DB_COLLATE', '');
//define('DB_CHARSET', 'utf8');
//define('DB_COLLATE', '');
3) Re-upload the updated ‘wp-config.php’ file overwriting the old one.
If you cannot find the two lines above in your ‘wp-config.php’ file, try adding them instead. Some hosts strip them out.
Friday, February 15, 2013
A Guide to WordPress Migration using the ‘Duplicator’ plugin

This Post covers the migration steps required for the migration of a WordPress installation using the 'Duplicator' plugin.
Please note that while all these steps have been thoroughly tested on many situations, they may not work in other scenarios depending on the configuration of the server and a number of factors. For example, one known issue at the time of writing is that the Migration Script requires at least PHP v 5.2.17+ running in the destination server.
Exporting
With these first steps we describe the actions to be taken at the original website.Login to the original WordPress installation:
Make sure that WordPress is running the latest version, if it isn't you will see a warning at the top of the pages in the Administration area urging you to update WordPress. Do that BEFORE attempting to start the migration process, as the modules are prepared for the latest version.
Install and activate the 'Duplicator' plugin:

Once it is installed and activated you'll see a new item named 'Duplicator' at the left side navigation menu of the pages in the WordPress Administration area.
Click on 'Dashboard' just below the new item named 'Duplicator' and you'll be presented with the following screen:

Create a Package:
To create a new export package click the create button (highlighted in red) and then 'Create Package'.
You don't really need to assign a new name, as it does not interfere with the process at all. By default it uses a slug that contains the name of the original WordPress installation followed by the current date, such as '20130215_xxx'.
Neither you need to pre-test the Package before clicking 'Create', as that feature is meant to make sure that very big packages can actually be generated without space problems.
It shouldn't take more than 1-2 minutes to complete (depending on how many pages are being migrated) before both the Installer and the Package files are created:
Click on each of the buttons to download both files to your computer.

Importing
With these steps we describe the actions to be taken at the destination website.Upload Package via FTP to the destination website:
Fire up Filezilla or FTP client of choice and upload both 'installer.php' and the zipped Package file to the destination website.
Depending on what version of PHP the server is running, there could be another file you need to upload. In our case, the solution provided by our web hosting provider was to add the following line to our .htaccess file:
AddType application/x-httpd-php53 .php
Create MySQL database:
Log in to the cPanel of the destination website and run the MySQL Database Wizard to create a new database and a user associated to it with 'ALL PRIVILEGES'. Make a note of the credentials that you will use in the next step.
Initiate Import:
Next visit your new destination website using a browser, where you will see just a text page with the 2 files we have uploaded by FTP (only 2 because the .htaccess file is not visible when browsing):

Click on 'installer.php' and the import operation should start and you should be presented with a screen where you must introduce your MySQL credentials.
Paste the MySQL database credentials from the previous step and click on the button that says 'Test Connection …'. You should see now a 'CONNECTION SUCCESFUL!' message.

Next tick 'I have read all warnings & notices' and click on the button that says 'Run Deployment'. You will come to a screen that shows the 'Old Settings' and the 'New Settings', no need to change anything here, just click on the button that says 'Update Tables'.
Final Steps:
That's it. The new site should be now migrated and live, but as recommended in the following screen, you should 'Resave Permalinks' and 'Delete Installer Files'.
Both operations require login to the new WordPress administration back-end, using the same exact credentials from the original WordPress installation.
Tuesday, December 8, 2009
A Web Developer's Collection of Web Resources
Cheat Sheets, Code, Tutorials and just about any Web Development resource that can be snatched.
- Apache (1)
- ASP (1)
- Banners (1)
- Cheat Sheets (8)
- CMS (1)
- CMSimple (1)
- CSS (5)
- DOCTYPE (1)
- DokuWiki (1)
- e-mails (1)
- eoCMS (1)
- Flash (1)
- Forms (2)
- Frog CMS (1)
- FUDforum (1)
- Habari (1)
- HTML (2)
- JavaScript (1)
- Jaws (1)
- jQuery (1)
- Lanius (1)
- MySQL (4)
- PDO (1)
- PHP (4)
- phpSQLiteCMS(1)
- razorCMS (1)
- Screen Resolutions (1)
- SEO (4)
- Serendipity (1)
- Skeleton (1)
- SQLite (2)
- Visuals (1)
- Website (1)
- WordPress (1)
Subscribe to:
Posts (Atom)